· tutorials · 4 min read
How to Use SandboxPostCopy to Remove .Invalid Emails
Use the SandboxPostCopy interface to streamline your sandbox refresh process. Learn how to use apex code to automate removal of .invalid from emails, generate test data, and censor sensitive information in sandboxes.
Refreshing sandboxes can be a pain in any Salesforce admin’s side. This can involve waiting for sandbox refreshes, resetting all required users’ emails, and creating test data or obfuscating production data. If you’re looking to speed up this process, you can use Apex classes to perform repetitive tasks like above after refreshing sandboxes. Below, we’ll provide a step by step guide on how to implement the SandboxPostCopy Interface and how to use it to modify data after refreshing your sandbox.
What is the SandboxPostCopy Interface?
SandboxPostCopy is an interface you can implement in an Apex class. You can use this to run Apex code after refreshing a sandbox. The official documentation from Salesforce also highlights methods that are tied to the SandboxPostCopy interface.
How to Run Apex Code During Refreshes
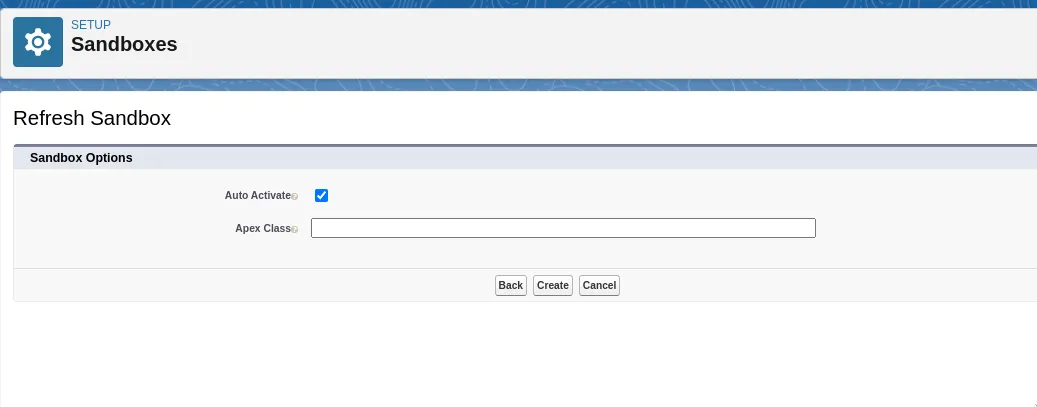
To run an apex class for a sandbox refresh, you need to input the apex class name during the sandbox refresh screen. You can see the menu to input below:
After defining the apex class that uses the SandboxPostCopy interface, Salesforce will run the code during the refresh process. After the sandbox refresh is complete, an email will be sent to the user who refreshed the sandbox containing the results of the apex class.

What Governor Limits are specific to SandboxPostCopy
Salesforce does not specify any additional limits when using the SandboxPostCopy interface. Standard Salesforce limits still apply to any code run in Salesforce.
What Sandbox Types Can Use SandboxPostCopy
All sandbox types can use the SandboxPostCopy interface. This includes:
- Partial Sandbox
- Full Sandbox
- Developer Pro Sandbox
SandboxPostCopy Use Cases
Most Salesforce Admins end up using this for one of these 3 reasons:
- Removing .invalid from email addresses. This allows faster, automated refreshing of emails for specific users.
- Generating test data. If your organization constantly uses developer sandboxes, generating sample data en masse can simplify usage.
- Censoring sensitive information. If your organization uses partial or full sandboxes, censoring emails, phone numbers, and names can be very beneficial. Additionally, changing this data can prevent running automation on your real customer data, resulting in unexpected emails or texts from your sandbox.
SandboxPostCopy Example: Removing .Invalid from Emails
Below is an example implementation of the SandboxPostCopy interface. You can see the two apex classes below. It’s important to note that this implementation uses a custom field, replace_email__c which is a checkbox on the User object. This allows you to select which users are eligible to have their email changed.
global class SandboxPostCopyScript implements SandboxPostCopy {

    global void runApexClass( SandboxContext context ) {

        List<User> users = [SELECT id, email, profileid FROM User WHERE isActive = true
                                         AND profile.Name = 'System Administrator' and replace_email__c = true]
                                         ;
        for ( User u : users ) {
            u.email = u.email.replace('@example.com', '').replace('=', '@').removeEndIgnoreCase( '.invalid' );
        }
        if(users.size() > 0){
            Database.update(users, false);
        }
    }
}
Additionally, test code coverage will be needed for the SandboxPostCopy class. The test class implements the method Test.testSandboxPostCopyScript(), which takes the following arguments:
- The apex class that implements SandboxPostCopy
- The Organization Id
- The Sandbox Id
- The Sandbox Name
@isTest
private class SandboxPostCopyTest {

    @isTest
    static void test_post_copy() {

        Profile p = [ SELECT id FROM Profile WHERE name = 'Standard User' ];
        Profile p2 = [ SELECT id FROM Profile WHERE name = 'System Administrator' ];
        User user1;
        User user2;

        System.runAs( new User( id = UserInfo.getUserId() ) ) {

            user1 = newUser( p.id, 'Alpha', 'User 1', 'user_1=salesforce.com@example.com' );
            user2 = newUser( p2.id, 'Beta', 'User 2', 'user_2@salesforce.com.invalid' );

            insert new User[] { user1, user2 };

        }

        Test.startTest();

        Test.testSandboxPostCopyScript(
            new SandboxPostCopyScript(), // apex class to run
            UserInfo.getOrganizationId(), // org id
            '00D90000000KY45', // sandbox id
            'Sandbox' // sandbox name
        );

        Test.stopTest();

        user1 = [ SELECT id, email FROM User WHERE id = :user1.id ];
        System.assertEquals( 'user_1=salesforce.com@example.com', user1.email );

        user2 = [ SELECT id, email FROM User WHERE id = :user2.id ];
        System.assertEquals( 'user_2@salesforce.com', user2.email );

    }

    private static User newUser( ID profileId, String firstName, String lastName, String email ) {
        Integer rand = Math.round( Math.random() * 1000 );
        return new User(
            isActive = true,
            profileId = profileId,
            alias = firstName.substring(0,1) + lastName.substring(1,5),
            firstName = firstName,
            lastName = lastName,
            email = email,
            username = rand + email,
            replace_email__c = true,
            emailEncodingKey = 'UTF-8',
            languageLocaleKey = 'en_US',
            localeSidKey = 'en_US',
            timeZoneSidKey = 'America/Chicago'
        );
    }

}
Conclusion
Refreshing sandboxes can be automated and made easier through the SandboxPostCopy interface. This allows for easier sandbox refreshes, and better data for testing.
Want to see this content in video form? Check out the video here:
Need Our Help To Get Your Data Into Salesforce?
Join dozens of other companies by learning how you can get all your company's data in one place.